Photo Slideshow Maker Platinum
- Software Features
- Flash Template Showcase
- Download Photo Slideshow Maker
- Flash Slideshow Solutions
- Free Web Album Service
- Flash Template Editor
- Create gift CD/DVD
- XML-driven Flash Gallery
- Support Services
- Frequently Asked Questions
- How to embed Flash to website
- Translate Photo Slideshow Maker
- Contact us
Flash Template Showcase
How to Create Photo Area/Photo Frame For Slideshow
Photo Area is one of the components in the slideshow template. It functions as a photo frame where photos will be shown. You can add more photo area component to Photo Slideshow Maker by creating Photo Area with Adobe Flash Professional CS5 program then importing to Template Editor for application. Please follow video tutorial below on how to create stylish Photo Area to make an unique photo frame that best fits your business websites, personal websites or social websites like myspace, blogger, friendster, etc.
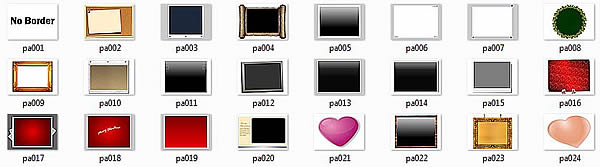
Below are the photo area components that available in Template Editor. You can create more photo area components according to your needs. Photo Slideshow Maker enables you to DIY slideshow photo frame, flash background, thumbnails, control buttons and other components to make your own template.
 Video Tutorial on How to Create Photo Area
In order to let you create photo area efficiently, we provide you with an online video tutorial on how to create photo area. Click link below to watch or download online video tutorial.
Watch online video: How to Create Photo Area
Download Video Tutorial
Here you can download the video tutorial. After downloading, please unzip file then open the HTML file inside to see the video. Please make sure the browser you are using has installed adobe flash player.
![]() Download video tutorial: Create Photo Area for Slideshow Template
Download video tutorial: Create Photo Area for Slideshow Template
Create Photo Area Efficiently
Just like other component files, this photo frame component includes a SWF file and a JPEG file. To create slideshow photo area efficiently, first make sure things below are well prepared.
What's required:
- Photo frame image
- Adobe Flash Professional CS5
- Image editing program( Paint, PhotoShop, etc.)
- Photo Slideshow Maker
![]() Download Free Trial of Photo Slideshow Maker
Download Free Trial of Photo Slideshow Maker
Follow Simple Steps to Make Photo Area Component.
Here we prepare a step-by-step tutorial based on the video tutorial for your reference. Follow simple steps below and you can also create photo area and use it in Photo Slideshow Maker like a Pro.
Step 1 Create photo area SWF file with Adobe Flash Professional CS5.
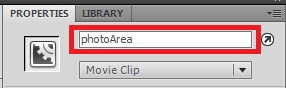
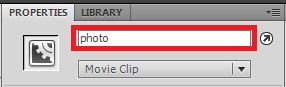
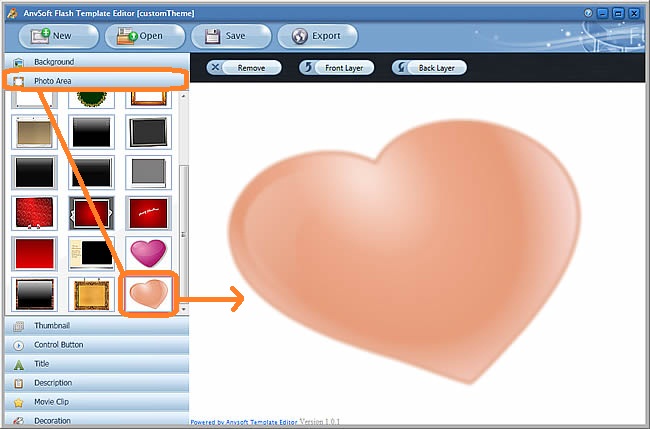
You need to create SWF file for the photo area component with Adobe flash Professional CS program. The flash file should at least contain two layers of movie clip symbols. One symbol which is the outmost one is for containing all the useful subject, inside this symbol there should be another symbol that containing the photo. And each layer symbol should have an instance name. The outmost symbol named "photoArea" and the inner symbol named "Photo". They should be named strictly, otherwise, it will results in error when applying photo area. This is very important.
|
|
If you want to create animated effect for the photo area, then you need to create an animation layer inside the "photoArea" symbol. If you apply images in the photo area like the example in the video, you can create mask layer to cover part of the image and show photo. In the example, we use heart image to design photo area, and add several frames with transformed images to create animated effect. To let the animation stop at the last frame, we add a layer named "as" with stop action script[ stop(); ]. You can use your own creativity to add more effect to this component. After clicking "control > test movie" and checking the photo area movie, you can export the .fla to .swf file. Don't forget to save file as .fla for future editing.
Step 2 Create JPEG image file.
This is an easy step for creating thumbnail image for photo area in Photo Slideshow Maker. You can open Paint in windows or other image editing program to edit the photo area image file. Resize photo area image file as 70x50 pixels and save as JPEG file.
Step 3 Import photo area component files to Photo Slideshow Maker
In this step, all you need to do is importing the .swf and .jpg file to Photo Slideshow Maker. If you are going to import photo area files to Photo Slideshow Maker Platinum, then you should put the photo area files under path as below
"C:\Program Files\AnvSoft\Photo Slideshow Maker Platinum\template\premium\templateEditor\material\photoArea"
The .swf and .jpg files are needed to be renamed. If there are 24 photo are components in this folder (as you can see the last file is named as "pa024"), then the new created photo area should be the NO.25 and both of the .swf and .jpg files should be named as "pa025".
After renaming, close folder and launch Template Editor in Photo Slideshow Maker Platinum, you will find the new component under Photo Area tab. Now, you can apply your new created photo area to custom slideshow theme as you like!
You can watch How to Import Component to review this step.
Download Photo Slideshow Maker
Photo Slideshow Maker give you more freedom to make your own slideshow. Please download Photo Slideshow Maker and follow the tutorial to enjoy the fun of slideshow creating.
![]()
Download Photo Slideshow Maker to Get Started!
Related resources
How to Create Flash Background
View Premium flash templates showcases